Introduction
When you're creating art for your Novelty games, it's important to know how to work with transparency and masks. Many art tools, such as Photoshop, makes it easy to save images with transparency intact, but there are still a few pitfalls that are easy to fall into.
Choosing the right image format
Novelty supports a range of image formats, but not all of them have support for transparency. This has to do with how many color channels they have. BMP, JPG and GIF only have three channels: Red, Green and Blue. Each channel has a byte-sized value (0 to 255), making it a total of 1.6 million color combinations.
Note: GIF-images only supports 256 unique colors and can have transparency by sacrificing one color to signify transparency.
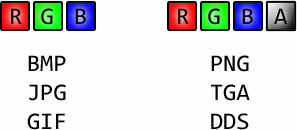
Fig 1: Color channels and formats
For true transparency (and semi-transparency) a fourth color channel is required. This one is generally called the alpha-channel or a "mask". PNG and DDS both have support for a single alpha channel while TGA can actually have more than one.
Note: PNG is the recommended format to use for transparent images in Novelty. DDS is the most efficient format but are only recommended for those who are familiar with it.
Bordering: a common issue
Now that you're familiar with the different formats it's time to bring up a common conundrum that can occur if you're not careful when creating transparent images. Consider the following scenario. You have an image of a character and you wish to cut away all the white parts and make it transparent. In this example we're using Photoshop:
![]()
![]()
Fig 2: Using the magic wand tool in Photoshop to clear out the white background.
![]()
Fig 3: Saving (for web) as PNG with transparency enabled.
![]()
Fig 4: Resulting image as seen in Designer, with white pixels surrounding the character.
The bordering problem doesn't appear until you try to use your image in Novelty. The first thing you need to try is to erase any white pixels that may have been left from before, but in some cases the border will occur no matter how much you erase.
One reason is that once that image is displayed in Novelty and rendered by your hardware all color channels will become slightly blurred and the color of one pixel will bleed into neighboring pixels. In some cases it may be due to how the image was saved by your graphics software.
If we open the saved PNG image in another graphics tool we see that the Photoshop actually left the white parts of the image intact as part and all it did was add an alpha channel. So the white pixels are bleeding into the neighboring pixels along the edge and that's why we're seeing a white border.
![]()
Fig 5: RGB + Alpha channel of the PNG-image.
Getting around the issue
Here are a few things you can do to avoid bordering:
Disable interpolation
The reason for color bleeding is due to the way the texture is interpolated (stretched) by your graphics card.
The easiest thing to do is to disable interpolation for your object by setting its pixelation attribute:
<Image name="My image" texture="My texture" pixelated="true"/>
The down-side with this approach is that without interpolation the image will look blocky unless the scale is exactly 100%.
Manually edit the RGB channels
If you have a tool that lets you edit RGB separate from the alpha-channel you can just add some color along the edges so the bleeding won't cause any bordering.
The alpha-channel is left as is.
![]()
Fig 6: Compensating for the bleeding by applying more color around the edges.
Use software that does it automatically
Some graphics tools are aware of this issue and will attempt to automatically assign a color to invisible pixels.
Photoshop will do this in certain cases (of which I'm not aware, unfortunately).
![]()
Fig 7: Photoshop automatically colorized invisible pixels around this character.
Final thoughts
Different software will treat the alpha-channel differently. Some will retain the RGB color of a pixel even if you can't see it. Some will assign the color white to invisible pixels. You may have to experiment on your own to come up with the best solution for you.
The best advice I can give is to always work in a transparent layer from the beginning when you're drawing characters and objects. If your drawing has multiple layers and you need to flatten them, make sure you're not including the background when you do that. That way an opaque background could never affect the color of a pixel and it will maintain its correct transparency when you save the image.